Optical fingerprint scanners are prominent security devices nowadays. These scanners are low-cost and easy to use with any embedded hardware platform. The scanners have built-in memory and a controller to store and compare fingerprints. Usually, optical fingerprint scanners have a USB and/or UART port to communicate with external controllers or computers. The scanner handles enrollment and matching of fingerprints, which communicates results through a USB or UART interface. One of such optical scanners is an R307 fingerprint sensor. R307 is a member of the R30X family of optical fingerprint scanners from Hangzhou Grow Technology Co., Ltd. This fingerprint scanner is comparable to the Adafruit AS608 fingerprint sensor. The Adafruit fingerprint library works well with both AS608 and R30X sensors.
This project will design a fingerprint-based access control system using the R307 fingerprint sensor and Arduino. The fingerprint sensor is capable of storing and matching fingerprints. The results of the fingerprint scans can be further used for any access control like opening a door lock, logging into a computer, or starting a car/bike. This project demonstrates the development of a fingerprint access system. There are three stages for this – enrollment, fingerprint matching, and application-based deployment.
Components required
- R307 Fingerprint sensor x1
- Arduino UNO x1
- SSD1306 OLED Display x1
Circuit connections
In this project, we are demonstrating a fingerprint-based access system. The main controller is Arduino UNO. The R307 fingerprint sensor is interfaced with the Arduino board for fingerprint matching, and the SSD1306 OLED display is interfaced with Arduino to provide a user interface.
The R307 fingerprint sensor has the following pin diagram.
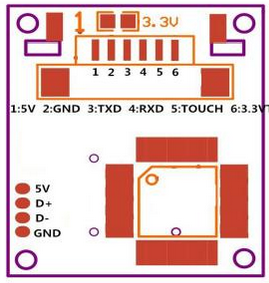
Pin diagram of R307 Fingerprint Sensor
Connect the 5V pin and GND of the sensor to 5V out and any of the ground pins of Arduino UNO, respectively. Connect TxD and Rxd pins of the sensor to pin D2 and D3 of Arduino, respectively. The pins D2 and D3 are used as Rx and Tx of software serial on the Arduino board.
The SSD1306 is interfaced with Arduino using the physical SPI port of Arduino. If we use software SPI in the sketch, it won’t work, and SSD1306 will be nonfunctional with a fingerprint sensor. In Arduino UNO, the software SPI shares the same UART as the software serial, and both cannot work simultaneously. So, for interfacing SSD1306 OLED via physical SPI port, connect the D0/SCK and D1/MOSI pins of SSD1306 OLED to pins D13 and D11 of Arduino, respectively. Connect pins DC, RESET, and CS of SSD1306 to pins D9, D10, and D8 of Arduino, respectively.
Arduino sketch for enrollment and configuration
Enrollment and configuration
First of all, we need to enroll fingerprints of valid users with the fingerprint sensor. After making circuit connections, upload the Arduino sketch for user enrollment and run Serial Monitor. The sketch is programmed to provide an administrator interface enabling enrolling a fingerprint, deleting a fingerprint, and emptying the fingerprint database. If the admin selects to enroll a fingerprint, it prompts for entering an ID number. After providing an ID number, the program prompts to scan a finger. Next, it prompts to scan finger once again for confirmation, and if both scans match, a fingerprint template is stored in the sensor with the given ID number.
If the admin selects to delete a fingerprint ID, she must enter a valid fingerprint ID number, and the corresponding fingerprint model is deleted. If the admin chooses to empty the fingerprint database, the program prompts for confirmation, and if confirmed, the entire fingerprint database is deleted.
The Arduino sketch for sensor administration begins with importing Adafruit Fingerprint Library. The software serial is instantiated for communication with the sensor. An instance of Adafruit_fingerprint class is defined as ‘finger’. Variables ‘operation’ and ‘id’ are defined to select an operation (enroll, delete, empty_database) and store a given fingerprint ID, respectively.
In the setup() function, the baud rate for serial communication with the serial monitor is set to 9600 bps. Until the serial port is detected, the program is instructed to do nothing. After a delay of 100 ms, an initial message indicating the name of a fictional security company is flashed on the serial monitor. The fingerprint sensor is initiated by calling begin() method of finger object. A user-defined function detectFingerprintScanner() is called to confirm the password of a fingerprint sensor. Next, a user-defined function verifyScannerParameters() is called to display various configuration parameters of the fingerprint sensor.
In the loop() function, a user-defined function readUserInput() is called to read user input from the serial monitor to select operation. Accordingly, either user-defined function enrollFingerprint() is called to enroll a fingerprint, deleteFingerprint() is called to delete a fingerprint model, or deleteDatabase() is called to empty fingerprint database. The function enrollFingerprint() itself uses another function getFingerprintEnroll() to handle complete fingerprint enrollment process. The readUserInput() is called wherever input from the user is required for selecting an operation, getting a fingerprint ID number, or admin confirmation.
Arduino sketch for fingerprint matching
After enrolling valid users, the fingerprint sensor has stored their fingerprint models. Now, it can compare new scans with existing models and verify if they match any stored models. Upload the sketch for fingerprint matching to the Arduino and open the serial monitor. If the sensor is connected correctly to Arduino, the serial monitor will flash a message indicating the fingerprint sensor is found. Next, until a finger is placed on the sensor, it displays the message “no finger detected”. If a finger is placed on the sensor and matches with a stored model, the serial monitor displays a message indicating the fingerprint ID found. If the finger does not correspond with any of the stored models, a message “Access Denied” is displayed on the serial monitor.
The sketch for fingerprint match begins with importing Adafruit Fingerprint Library, and the software serial is instantiated for communication with the sensor. An instance of Adafruit_fingerprint class is defined as ‘finger’.
In the setup() function, the baud rate for serial communication with a serial monitor is set to 9600 bps. Until the serial port is detected, the program is instructed to do nothing. After a delay of 100 ms, the fingerprint sensor is initiated by calling begin() method of finger object. Next, the password of the fingerprint sensor is verified.
In the loop() function, finger.getImage() method is called, and the value returned by it is stored in a variable ‘p’. If the returned value is ” FINGERPRINT_NOFINGER”, the program is instructed to goto label NoFinger, which calls a block of code displaying a message “No finger detected” on the serial monitor. Otherwise, if the returned value is ” FINGERPRINT_OK”, methods finger.image2Tz() to convert scanned image, and finger.fingerFastSearch() to match scan with stored models are called. Suppose any of these methods return a value other than ” FINGERPRINT_OK”. In that case, the program is instructed to goto label NoMatch, which calls a block of code displaying a message “Access Denied” on the serial monitor. If both these methods return a value ” FINGERPRINT_OK “, the scan is successfully matched to one of the stored models, and the serial monitor displays a message indicating found fingerprint ID.
Arduino sketch for access system
Fingerprint-based access control system
Finally, the sensor is ready for deployment in a security system or access control. Here, the access control is shown with the help of a display interface. The SSD1306 OLED is used to provide this display interface. SSD1306 is interfaced with Arduino using the physical SPI port of the Arduino. Upload the sketch for the access control system. Place a finger enrolled with the sensor; the display will show the ID number and indicate granting access. Place a finger not registered with the sensor; the display will show a message denying access.
The sketch for the access control system with SSD1306 OLED display begins by importing SPI and Wire libraries for data communication via SPI port. Next, Adafruit_GFX and Adafruit_SSD1306 libraries are imported for the SSD1306, and the Adafruit_Fingerprint library is imported for working with the R307 fingerprint sensor. The software serial is instantiated for communication with the sensor. An instance of Adafruit_fingerprint class is defined as ‘finger’. Constants and pin connections with SSD1306 are described in the code following the instantiation of a display object. A bitmap for logo display is stored in PROGMEM, and the array is generated for the same bitmap image.
In the setup() function, the baud rate for serial communication with a serial monitor is set to 9600 bps. The display is initialized by calling display.begin() method, and the starting screen is flashed by calling display.display() method. The fingerprint sensor is initiated by calling begin() method of finger object. The display is cleared, and drawBitmap() function is called to flash a logo. The logo shows up on the screen when display.display() method is called.
In the loop() function, finger.getImage() method is called to get a scan from the sensor. Next, the finger.image2Tz() method is called to convert image and finger.fingerSearch() method is called to match the scan with stored fingerprint models. The returned value from the finger.fingerSearch() method is used to grant access or deny access.
Conclusion
Fingerprint scanners are fool-proof and easy-to-use security devices. In this project, an access control system is designed using the R307 fingerprint scanner. The results of a fingerprint scan can be used to open a door, start a car/bike engine, or log in to a computer. These applications can be developed by adding a connection to an additional GPIO of the controller board (Arduino UNO here) and providing an appropriate logical signal for the binary cases of a fingerprint match found and not found.
You may also like:


Filed Under: Arduino Projects, Electronic Projects, Video
Questions related to this article?
👉Ask and discuss on Electro-Tech-Online.com and EDAboard.com forums.
Tell Us What You Think!!
You must be logged in to post a comment.