In this project, we’ll create an 8-bit IO port Arduino library that reads and writes all eight bits in a single command by combining Arduino’s pins. This means sending and receiving the 8-bit data from a single pin will be possible.
Arduino provides digital output using the digitalWrite() function and receives digital input via the digitalRead() function. By using these two functions, Arduino can give output or input from any single pin. However, Arduino typically only provides input or output from one pin at a time.
So, to interface Arduino with an 8-bit IO device — such as a 7-segment display, DIP switches, or DAC (digital-to-analog converter), eight different pins are usually required. The data byte (8-bit) pattern is sent to different pins as ‘1s’ and ‘0s.’ For example, if a data byte is 37h (0011 0111), it’s necessary to send the ‘0’ and ‘1’ pattern to eight different pins using the digitalWrite() function.
To resolve this situation, we created an 8-bit IO port (input-output port) library that combines Arduino’s pins. It works as an 8-bit IO port for Arduino and configures its data direction as input or output. The data direction is set by the character ‘O’ for the output and ‘I’ for the input.
This library has five functions. Two ” constructors ” create the port object(s), including one function that sends the 8-bit digital output to the port pins and another that receives the 8-bit digital input from the port pins. A third function alters and sets the port’s IO direction. All five functions are explained next.
The five functions
1. IO_Port_8bit(int pin1,int pin2,int pin3,int pin4,int pin5,int pin6,int pin7,int pin8,char dir)
This constructor creates object(s) of this class. It can make one or several 8-bit port(s) by combining specific Arduino pins. It’s important to specify which eight Arduino pins to combine, along with the data direction of each port (the input or output). The last argument, dir, defines whether a port works as input or output.
- If the dir=’O’ = the port works as output
- If the dir=’I’ = the port works as input
The same port cannot work as input and output simultaneously or alternatively. The port’s direction must be selected or it will result in an error.
2. IO_Port_8bit(int pin1,int pin2,int pin3,int pin4,int pin5,int pin6,int pin7,int pin8)
This is another constructor, which creates object(s) of this class. It can make one or several 8-bit port(s) by combining specific Arduino pins. It’s important to specify which eight Arduino pins to combine for each port. However, including the data direction as input or output is unnecessary.
Instead, after creating a port object using this constructor, set the port direction using the set_IO_direction function. This constructor allows the programmer to alter the direction of port data in run time. So, a port can work as input or output alternatively (but not simultaneously).
3. set_IO_direction(char dir)
This function specifies the input and output direction of a port. It has one character argument, which is ‘I’ for a port that’s input and ‘O’ for a port that’s output. An error will be displayed on Arduino’s serial monitor if the data direction is not selected.
4. send_8bit_data(int byt)
This function sends 8-bit data to specified pins. It provides the ‘int’ data (must be < 255) as an argument, which is sent directly to eight different pins. If data is >255, an error will be displayed on Arduino’s serial monitor.
5. get_8bit_data(void)
This function receives 8-bit data from specified pins. It returns the 8-bit ‘int’ data by reading the status of the eight different pins.
Example 1: Blink eight LEDs alternatively at a rate of 1 Hz
#include<IO_Port_8bit.h>
IO_Port_8bit myport(2,3,4,5,6,7,8,9,’O’); //create output port
void setup() // nothing required in setup
{
}
void loop()
{
myport.send_8bit_data(85);// send data to blink all odd LEDs
delay(500);
myport.send_8bit_data(170); send data to blink all even LEDs
delay(500);
}
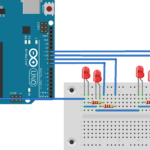
Circuit diagram

Example 2: Display a binary counting pattern on the LEDs, from 0 to F
#include <IO_Port_8bit.h>
IO_Port_8bit my8bitport(2,3,4,5,6,7,8,9);//create port object
void setup()
{
my8bitport.set_IO_direction(‘O’);// set port direction
}
void loop()
{
int i;
for(i=0;i<16;i++) //send data 0 to 15 to display
{ // binary pattern
myport.send_8bit_data(i);
delay(200);
}
}
Example 3: Indicate the analog input voltage level on an 8-bit LED bar graph display
#include<IO_Port_8bit.h>
IO_Port_8bit myport(2,3,4,5,6,7,8,9,’O’); //create output port object
void setup()
{
myport.send_8bit_data(255); //blink all LEDs of bar graph once
delay(500);
myport.send_8bit_data(0);
}
void loop()
{
int level;
level = analogRead(A0); //read analog input voltage
level = map(level,0,1023,0,80);// limit the voltage from 0 to 80
//increase or decrease bar graph level as per input
if((level<80) && (level>70)) myport.send_8bit_data(255);
else if((level<=70) && (level>60)) myport.send_8bit_data(127);
else if((level<=60) && (level>50)) myport.send_8bit_data(63);
else if((level<=50) && (level>40)) myport.send_8bit_data(31);
else if((level<=40) && (level>30)) myport.send_8bit_data(15);
else if((level<=30) && (level>20)) myport.send_8bit_data(7);
else if((level<=20) && (level>10))myport.send_8bit_data(3);
else if((level<=10) && (level>0)) myport.send_8bit_data(1);
else if(level==0) myport.send_8bit_data(0);
}
Circuit diagram

Example 4: Receive an 8-bit digital input from DIP switches and display value on serial monitor
#include<IO_Port_8bit.h>
IO_Port_8bit myport(2,3,4,5,6,7,8,9); //create port object
void setup()
{
Serial.begin(9600); // initialize serial commu.
myport.set_IO_direction(‘I’); // set port direction
Serial.println(“8-bit input port test”);
}
void loop()
{
int input_byt;
input_byt = myport.get_8bit_data(); // read the DIP switch status
Serial.print(“received input = “); // and
Serial.println(input_byt); // display its value
delay(1000);
}
Circuit diagram

You may also like:


Filed Under: Arduino Projects, Electronic Projects
Questions related to this article?
👉Ask and discuss on Electro-Tech-Online.com and EDAboard.com forums.
Tell Us What You Think!!
You must be logged in to post a comment.