Data logging is an integral part of many embedded projects. Typically, data logging is used to record sensor readings, with or without a timestamp. For example, many IoT applications use data logging to store network changes or data for troubleshooting or verification.
The ideal way to log data locally is using an SD or MicroSD card. Most card readers can be interfaced with microcontrollers or microcomputers via an SPI port.
MicroPython’s machine module firmware contains a class SDCard for working with SD and MicroSD card readers. The class machine.SDCard supports SD, MMC, and eMMC storage devices. The communication protocol for all three types of storage devices is via the SPI port.
The SDCard class can be implemented using MicroPython’s Pyboard, ESP32, CC3200, and mimxrt ports. The SDCard module is not supported though other ports.
In this article, we’ll discuss how to interface an SD or MicroSD card reader with ESP32.
With these cards, 4 to 128 GB of storage can be added to the embedded system. The sensor data or other data is logged into plain text files on the SD/MicroSD card. Most of the SD or MicroSD cards provide a 1-bit wide interface to the memory card. The SPI port is used on the SD card breakout boards to access the storage device.
Components required
The following components are required for data logging on ESP32.
1. ESP32 x1
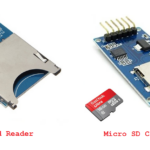
2. MicroSD card module x1
3. 8GB MicroSD card
4. MicroUSB cable to connect the ESP32 with computer
5. Jumper wires
MicroSD card module
The MicroSD card module contains a slot for inserting the card and six terminals to interface with a microcontroller. VDD and ground are two of the pins. The other four pins — MISO, MOSI, SCK, and CS — are the SPI port terminals facilitating the 1-bit wide interface to the memory card.
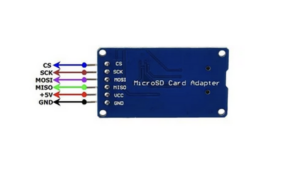
The pin configuration of a MicroSD card.
MicroSD card and ESP32
To interface the MicroSD card module with ESP32:
- Connect the module’s MOSI, MISO, SCLK, and CS pins with ESP32’s GPIO12, GPIO13, GPIO14, and GPIO27 pins. These pins correspond to ESP32’s HSPI (SPI1).
- Connect the module’s VCC and GND pins to ESP32’s 3.3V and ground.
The MicroSD card readers have onboard voltage regulators for converting the input voltage to 3.3V DC. But a voltage as high as 5V DC can damage the module or corrupt the memory card.
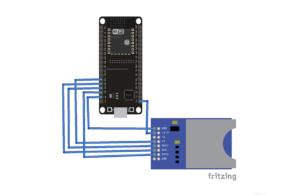
The circuit connections to interface the MicroSD card module with ESP32 .
The MicroPython machine module
The MicroPython’s machine module is written to handle the hardware functions of the supported ports. The module includes classes for controlling or managing the digital input/output, output signals from external devices, pulse width modulation, analog to digital conversion, controlling ADC peripherals, UART, SPI, I2C, I2S, Timer, RTC, watchdog timer, and SD card.
The module’s SDcard class supports reading SD, MMC, and eMMC memory cards.
Class SDCard
The SDCard class provides access to the SD or MMC memory cards using a dedicated SD/MMC interface on a given MicroPython port or through an SPI channel.
To use the class within a MicroPython script, the sdcard.py must be uploaded to ESP32 and then imported into the script. The OS and machine module must also be imported.
To import the necessary modules, add this statement within a MicroPython script:
import machine, sdcard, os
An object of the SDCard class must be initialized within the script. The constructor for SDCard class has this prototype:
class machine.SDCard(slot=1, width=1, cd=None, wp=None, sck=None, miso=None, mosi=None, cs=None, freq=20000000)
The parameters in the constructor function:
- slot: selects one of the available interfaces or uses the default
- width: selects the bus width for the SD/MMC interface (For SD/MicroSD card adaptors, the width is “1.” It’s not required to be specified explicitly unless the hardware on the SD card’s port has a parallel interface to read memory cards.)
- cd: specifies a card-detect pin
- wp: specifies a write-protect pin
- sck: specifies an SPI clock pin
- miso: specifies an SPI miso pin
- mosi: specifies an SPI mosi pin
- cs: specifies an SPI chip select pin
- freq: selects the SD/MMC interface frequency in Hz (only supported on the ESP32)
There are two hardware SPI blocks in ESP32: HSPI (SPI1) and VSPI (SPI2). For this project, the MicroSD card adaptor is interfaced via SPI 1.
To initiate the SDCard object, add this statement to the MicroPython script:
sd = sdcard.SDCard(machine.SPI(1), machine.Pin(27))
The OS module
The MicroPython OS module provides functions for file system access and mounting. The following methods are useful when working with a MicroSD card.
os.VfsFat(): creates a file system object that uses the FAT filesystem format. A block device, which implements the block protocol, provides the FAT file system storage. Essentially, it enables a device to support the MicroPython file system. The physical hardware is represented by the file system class. A FAT file system is used when an object is created with os.VfsFat(). The object can be mounted using the os.mount() method.
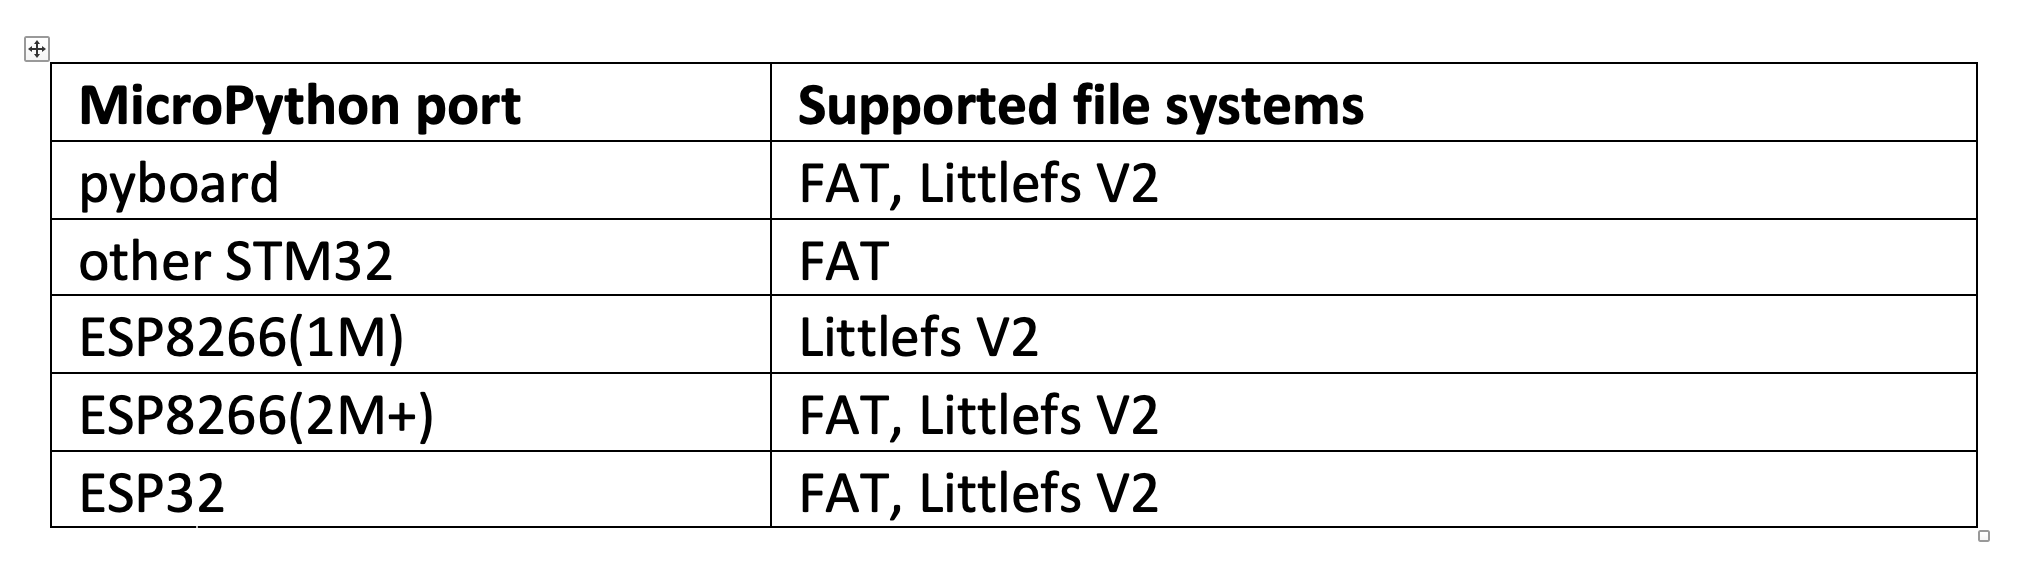
MicroPython ports supported file systems.
os.mount(): mounts specified file system objects in the virtual file system’s location that’s given by a string argument. The file system object can be a virtual object that has a mount() method or a block device. If it’s a block device, then the file system type is automatically detected; otherwise, an exception is raised.
The string specifying location might be ‘/’ to mount the file system object at the root or ‘/<name>’ to mount it at a subdirectory under the root. The method takes three arguments: a file system object, a string specifying location, and a read-only parameter. If the read-only is “True,” then the file system is mounted as read-only. If the location is already mounted, it raises an OSError(EPERM).
os.listdir(): if called without an argument, it lists the current directory. Otherwise, it lists the specified directory.
os.umount(): “unmounts” a file system. The location can be a string naming the mount location, or a previously mounted file system object. During the unmounting process, the method umount() is called for the file system object.
This is a valid example of a FAT file system for a MicroSD card, mounting the file system’s object in memory.
vfs = os.VfsFat(sd)
os.mount(vfs, “/fc”)
print(“Filesystem check”)
print(os.listdir(“/fc”))
Creating text files
Adding plain text files to a MicroSD card is simple. It’s possible to create multiple plain text files on a memory card. Simply create a string specifying the path for the text file.
Here’s a valid example for creating plain text files on a MicroSD card using MicroPython.
fn = “/fc/log.txt”
Writing a single block
A single block is one line of text. A file must be specified with a string variable and a specified file path must be opened using the open() method to write a block. The “w” argument must also be passed as a file mode. A single block can be written by calling the write() method.
This is a valid example of writing a single block in a text file on a MicroSD card.
fn = “/fc/one-line-log.txt”
print()
print(“Single block write”)
with open(fn, “w”) as f:
n = f.write(“1234567890\n”) # one block
print(n, “bytes written”)
Reading a single block
To read a file, the file specified by a string variable must be opened using the open() method with the file mode specified as “r.” The file is read by calling the read() method.
This a valid example of reading a text file from a MicroSD card.
fn = “/fc/one-line-log.txt”
print()
print(“Single block read”)
with open(fn, “r”) as f:
result = f.read()
print(len(result2), “bytes read”)
print()
print(result)
Writing multiple blocks
Writing multiple blocks in a text file is similar to writing a single block, except that the string object that’s passed contains several lines of text.
Here’s a valid example of writing multiple blocks in a text file on a MicroSD card.
line = “abcdefghijklmnopqrstuvwxyz\n”
lines = line * 200 # 5400 chars
fn = “/fc/multi-line-log.txt”
print()
print(“Multiple block write”)
with open(fn, “w”) as f:
n = f.write(lines)
print(n, “bytes written”)
Reading multiple blocks
Multiple lines in a text file are read similarly to a single line. Here’s a valid example of reading multi-block text file from a MicroSD card.
fn = “/fc/multi-line-log.txt”
print()
print(“Multiple block read”)
with open(fn, “r”) as f:
result = f.read()
print(len(result2), “bytes read”)
print()
print(result)
Getting ESP32 ready
Before continuing, ensure MicroPython IDE is ready to write, edit, and upload the codes. You can use uPyCraft IDE or Thonny IDE as the software development. With the help of the respective IDE, upload the MicroPython firmware to ESP8266 or ESP32.
To learn how click here.
Uploading sdcard.py to ESP32
In uPyCraft IDE, create a new file by navigating Files->New. Copy and paste the following code into the file and save it as sdcard.py.
Click on “DownloadandRun” button to upload the sdcard.py in root directory of ESP32. Check the console log to verify the writing and reading of the text files on the MicroSD card. Once the files are written, the number of bytes is reported. After the files are read, the number of bytes are read, and the read text is printed in the console.
You may also like:


Filed Under: Python, Tutorials
Questions related to this article?
👉Ask and discuss on Electro-Tech-Online.com and EDAboard.com forums.
Tell Us What You Think!!
You must be logged in to post a comment.