Engineers Garage

  • Electronic Projects & Tutorials
    • Electronic Projects
      • Arduino Projects
      • AVR
      • Raspberry pi
      • ESP8266
      • BeagleBone
      • 8051 Microcontroller
      • ARM
      • PIC Microcontroller
      • STM32
    • Tutorials
      • Audio Electronics
      • Battery Management
      • Brainwave
      • Electric Vehicles
      • EMI/EMC/RFI
      • Hardware Filters
      • IoT tutorials
      • Power Tutorials
      • Python
      • Sensors
      • USB
      • VHDL
    • Circuit Design
    • Project Videos
    • Components
  • Articles
    • Tech Articles
    • Insight
    • Invention Stories
    • How to
    • What Is
  • News
    • Electronic Product News
    • Business News
    • Company/Start-up News
    • DIY Reviews
    • Guest Post
  • Forums
    • EDABoard.com
    • Electro-Tech-Online
    • EG Forum Archive
  • DigiKey Store
    • Cables, Wires
    • Connectors, Interconnect
    • Discrete
    • Electromechanical
    • Embedded Computers
    • Enclosures, Hardware, Office
    • Integrated Circuits (ICs)
    • Isolators
    • LED/Optoelectronics
    • Passive
    • Power, Circuit Protection
    • Programmers
    • RF, Wireless
    • Semiconductors
    • Sensors, Transducers
    • Test Products
    • Tools
  • Learn
    • eBooks/Tech Tips
    • Design Guides
    • Learning Center
    • Tech Toolboxes
    • Webinars & Digital Events
  • Resources
    • Digital Issues
    • EE Training Days
    • LEAP Awards
    • Podcasts
    • Webinars / Digital Events
    • White Papers
    • Engineering Diversity & Inclusion
    • DesignFast
  • Guest Post Guidelines
  • Advertise
  • Subscribe

Arduino-based walking steps and distance calculator

By Nikhil Agnihotri July 23, 2023

A very common feature in Android and iOS fitness apps is calculating the number of steps the user walks and the distance he covers. These apps calculate the number of steps walked by the user either using GPS location and manipulating the geospatial data or by monitoring the acceleration vector of the device using an accelerometer sensor.

In this project, we have designed a similar walking steps calculator on the Arduino platform. The method used in this project is monitoring the acceleration vector of the device. For this purpose, the ADXL345 accelerometer is interfaced with the Arduino. The number of steps walked by the user and the distance covered by him are displayed on an OLED screen. The logic used in this project can be easily replicated in a smartwatch application. You can easily port the code logic to any other language as it simply reads the data from the accelerometer sensor and manipulates that data to detect the user’s movement.

Components required

  1. Arduino UNO x1
  2. ADXL345 Accelerometer Sensor x1
  3. SSD1306 OLED display x1
  4. Connecting wires/Jumper wires

Circuit connections
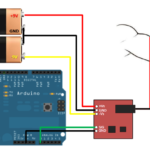
For designing this project, the ADXL345 accelerometer sensor and SSD1306 OLED are interfaced with the Arduino. To do this, connect its GND and VCC pins to Arduino’s ground and 3.3V out pins. Then connect the SDA and SCL pins of the accelerometer sensor to the SDA and SCL pins on the I2C  port of the Arduino.

In this project, a 7-pin SSD1306 OLED module is interfaced to Arduino UNO. The module is connected to the Arduino as follows.

Circuit Diagram of Arduino based Pedometer

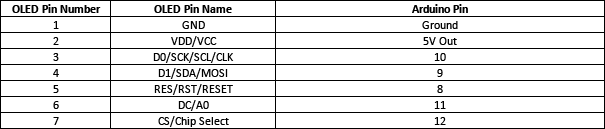
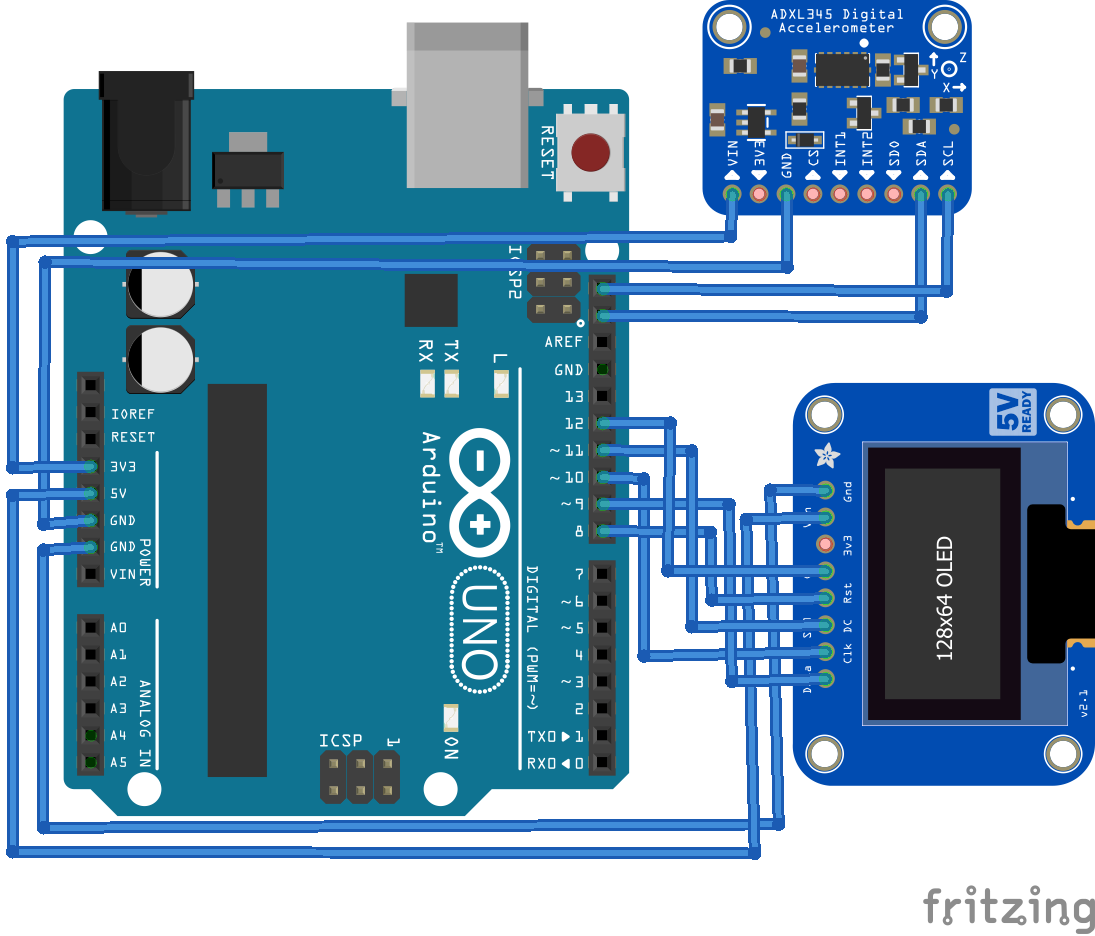
Circuit Diagram of Arduino-based Pedometer

Arduino sketch


How it works
When the device is powered on, the SSD1306 OLED display is initialized, and the logo of “EEWORLDONLINE” and the device name “Steps Counter” are flashed on the screen. The initial number of steps is displayed to be 0, and the distance covered is also displayed as 0. Now, all the user needs to do is keep the device on their person.

The device continuously monitors its acceleration vector with the help of the ADXL345 accelerometer sensor. When the user walks, there is a change in the acceleration vector. When the user steps a foot forward, the immediate change in acceleration vector goes negative. As the user steps the other foot balancing on the previous foot, the immediate change in acceleration vector goes positive.

Average acceleration values are calculated as the device is powered on and initial messages are flashed on the screen. The average values are also derived by taking the mean of 50 consecutive readings from the ADXL345 accelerometer. These average values for the acceleration of the device in the x-, y-, and z-axis serve as the reference point.

After the initial setup is complete, the device again calculates the acceleration in x-, y-, and z-axis 50 consecutive times and derives an average of those values. The acceleration vector of the device is calculated by taking the square root of the difference of current acceleration values compared to reference values.

After a delay of 250  milliseconds, the device again calculates the acceleration in x-, y-, and z-axis for 50 consecutive times and derives the average of those values. The acceleration vector of the device is calculated once again at an interval of 250 ms by taking the square root of the difference of current acceleration values compared to reference values. The difference between the acceleration vector now and the acceleration vector 250 ms before is calculated, and if the difference is more than 0.05, a step is incremented. The value of distance covered is calculated by multiplying the number of steps by one foot or 0.3048 meters, assuming that an average step is one foot long.

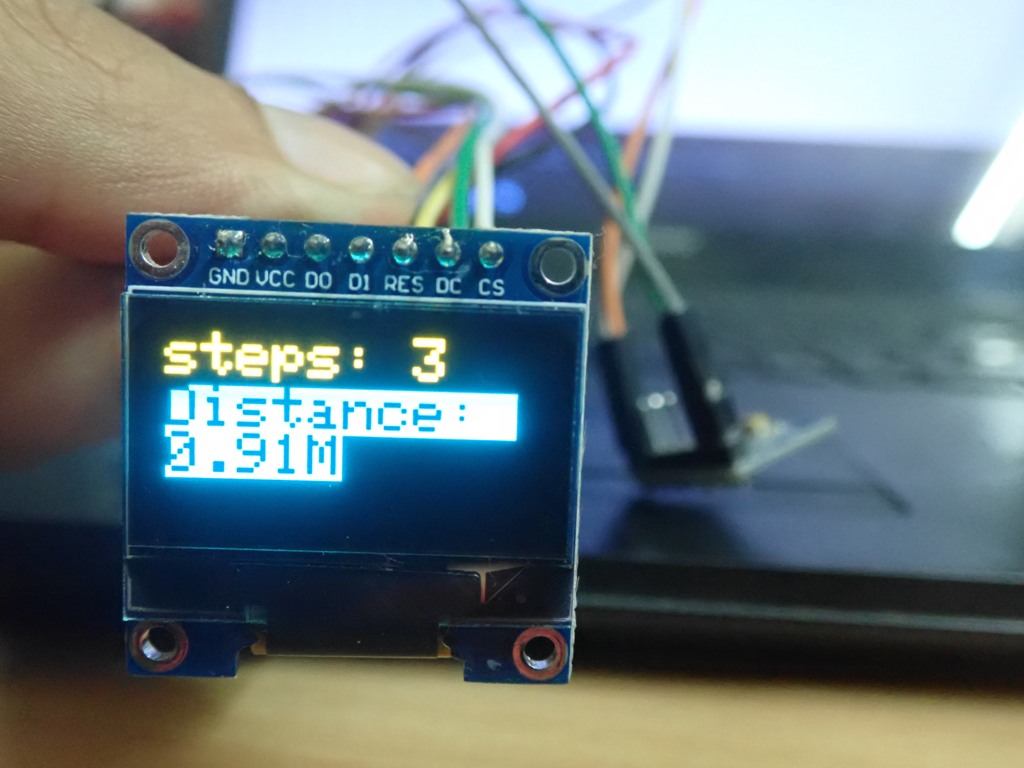
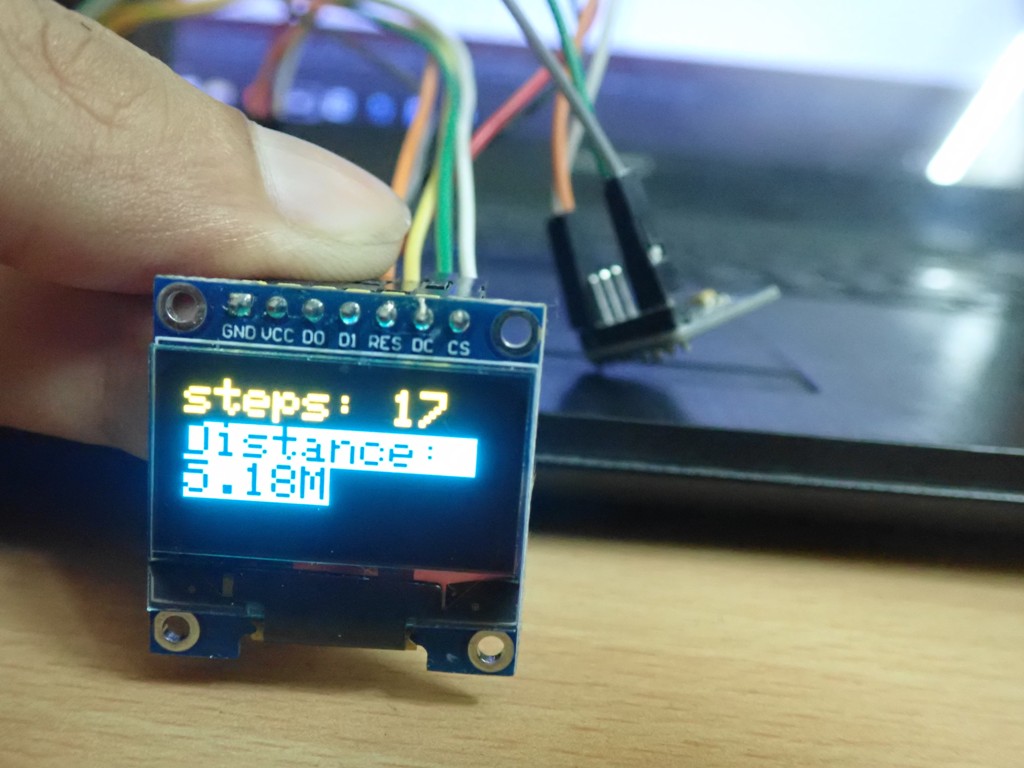
The number of steps and distance covered are updated on the OLED screen, with a delay of 400 ms. The process of calculating the difference between two consecutive acceleration vectors of the device at an interval of 250 ms is continued throughout to monitor the user’s movement.

It should be noted that the delay of 250 ms between the calculation of two consecutive averaged acceleration vectors and the difference of 0.05 is obtained after careful calibration of the device.

Check out this link to learn more about how the ADXL345 accelerometer communicates with Arduino over the I2C protocol.

To learn more about interfacing SSD1306 OLED with Arduino, check out this link.

You should note that Arduino’s reset button acts as a reset button for the device and reset the number of steps and distance covered to zero.

The code
The code begins by importing wire.h for I2C communication with the ADXL345 accelerometer sensor and SPI.h for communication SSD1306 OLED display. The Adafruit libraries for working with OLED display are imported and the constants required for OLED interfacing and defined parameters. An object display is initialized for the SSD1306 class. The bitmap for the logo of EEWORLDONLINE is stored in Arduino’s PROGMEM and is converted to an array object. The variables to store average, current, and immediately next acceleration values are declared. A variable to store the number of steps is declared.

In the setup() function, three different functions are called. The ssd1306_init() is called to initialize the SSD1306 OLED display and flash initial messages onto it. The adxl345_init() is called to initialize the acceleration sensor. The read_av_acc() function is called to calculate reference acceleration values when the device is at rest.

In the loop() function, the acceleration vector is calculated twice at a gap of 250 ms, and if the difference between two values of greater than 0.05, one step is incremented. The number of steps and distance covered are updated to OLED display.
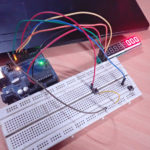
Result

Arduino based Pedometer using ADXL345 and SSD1306

Arduino based Pedometer using ADXL345 and SSD1306

Demonstration Video


You may also like:

  • battery types
    What are the different battery types for specific applications?

  • Arduino-based token display board controller
  • pollution monitoring
    Arduino-based portable pollution monitor with OLED display

  • Arduino-based electronic leveling device

  • Insight into Arduino: Beginner’s Guide

  • Designing an Arduino-based EMG monitor

Filed Under: Arduino Projects, Electronic Projects, Sensors, Tutorials, Video
Tagged With: Arduino, Arduino ADXL345, Arduino pedometer, Arduino pedometer adxl345, Arduino projects, Arduino walking distance calculator, Arduino Walking Steps Calculator
 

Next Article

← Previous Article
Next Article →

Questions related to this article?
👉Ask and discuss on EDAboard.com and Electro-Tech-Online.com forums.


Tell Us What You Think!! Cancel reply

You must be logged in to post a comment.

EE TECH TOOLBOX

“ee
Tech Toolbox: Internet of Things
Explore practical strategies for minimizing attack surfaces, managing memory efficiently, and securing firmware. Download now to ensure your IoT implementations remain secure, efficient, and future-ready.

EE Learning Center

EE Learning Center
“engineers
EXPAND YOUR KNOWLEDGE AND STAY CONNECTED
Get the latest info on technologies, tools and strategies for EE professionals.

HAVE A QUESTION?

Have a technical question about an article or other engineering questions? Check out our engineering forums EDABoard.com and Electro-Tech-Online.com where you can get those questions asked and answered by your peers!


RSS EDABOARD.com Discussions

  • Reducing "shoot-through" in offline Full Bridge SMPS?
  • High Side current sensing
  • How to simulate power electronics converter in PSpice?
  • Voltage mode pushpull is a nonsense SMPS?
  • Layout IRN reduction in Comparator

RSS Electro-Tech-Online.com Discussions

  • Back to the old BASIC days
  • Parts required for a personal project
  • PIC KIT 3 not able to program dsPIC
  • Failure of polypropylene motor-run capacitors
  • Siemens large industrial PLC parts

Featured – RPi Python Programming (27 Part)

  • RPi Python Programming 21: The SIM900A AT commands
  • RPi Python Programming 22: Calls & SMS using a SIM900A GSM-GPRS modem
  • RPi Python Programming 23: Interfacing a NEO-6MV2 GPS module with Raspberry Pi
  • RPi Python Programming 24: I2C explained
  • RPi Python Programming 25 – Synchronous serial communication in Raspberry Pi using I2C protocol
  • RPi Python Programming 26 – Interfacing ADXL345 accelerometer sensor with Raspberry Pi

Recent Articles

  • What is AWS IoT Core and when should you use it?
  • AC-DC power supply extends voltage range to 800 V DC
  • Infineon’s inductive sensor integrates coil system driver, signal conditioning circuits and DSP
  • Arm Cortex-M23 MCU delivers 87.5 µA/MHz active mode
  • STMicroelectronics releases automotive amplifiers with in-play open-load detection

EE ENGINEERING TRAINING DAYS

engineering

Submit a Guest Post

submit a guest post
Engineers Garage
  • Analog IC TIps
  • Connector Tips
  • Battery Power Tips
  • DesignFast
  • EDABoard Forums
  • EE World Online
  • Electro-Tech-Online Forums
  • EV Engineering
  • Microcontroller Tips
  • Power Electronic Tips
  • Sensor Tips
  • Test and Measurement Tips
  • 5G Technology World
  • Subscribe to our newsletter
  • About Us
  • Contact Us
  • Advertise

Copyright © 2025 WTWH Media LLC. All Rights Reserved. The material on this site may not be reproduced, distributed, transmitted, cached or otherwise used, except with the prior written permission of WTWH Media
Privacy Policy

Search Engineers Garage

  • Electronic Projects & Tutorials
    • Electronic Projects
      • Arduino Projects
      • AVR
      • Raspberry pi
      • ESP8266
      • BeagleBone
      • 8051 Microcontroller
      • ARM
      • PIC Microcontroller
      • STM32
    • Tutorials
      • Audio Electronics
      • Battery Management
      • Brainwave
      • Electric Vehicles
      • EMI/EMC/RFI
      • Hardware Filters
      • IoT tutorials
      • Power Tutorials
      • Python
      • Sensors
      • USB
      • VHDL
    • Circuit Design
    • Project Videos
    • Components
  • Articles
    • Tech Articles
    • Insight
    • Invention Stories
    • How to
    • What Is
  • News
    • Electronic Product News
    • Business News
    • Company/Start-up News
    • DIY Reviews
    • Guest Post
  • Forums
    • EDABoard.com
    • Electro-Tech-Online
    • EG Forum Archive
  • DigiKey Store
    • Cables, Wires
    • Connectors, Interconnect
    • Discrete
    • Electromechanical
    • Embedded Computers
    • Enclosures, Hardware, Office
    • Integrated Circuits (ICs)
    • Isolators
    • LED/Optoelectronics
    • Passive
    • Power, Circuit Protection
    • Programmers
    • RF, Wireless
    • Semiconductors
    • Sensors, Transducers
    • Test Products
    • Tools
  • Learn
    • eBooks/Tech Tips
    • Design Guides
    • Learning Center
    • Tech Toolboxes
    • Webinars & Digital Events
  • Resources
    • Digital Issues
    • EE Training Days
    • LEAP Awards
    • Podcasts
    • Webinars / Digital Events
    • White Papers
    • Engineering Diversity & Inclusion
    • DesignFast
  • Guest Post Guidelines
  • Advertise
  • Subscribe